Why? 🤷
Frustrated by the complexity
and incomplete docs/tests
in existing auth solutions,
we built auth_plug to simplify our lives. <br />
We needed a way to minimise
the steps
and code required
to add auth to our app(s).
With auth_plug we can setup
auth in any Elixir/Phoenix
App in less than 2 minutes
with only 5 lines of config/code
and one environment variable.

What? 🔐
An Elixir Plug (HTTP Middleware)
that a complete beginner can use to add auth to a
Phoenix App
and understand how it works. <br />
No macros/behaviours to use (confuse).
No complex configuration or "implementation".
Just a basic plug that uses Phoenix Sessions
and standards-based JSON Web Tokens (JWT).
Refreshingly simple. The way auth should be done.
 Edit this diagram:
[docs.google.com/presentation/d/1PUKzbRQOEgHaOmaEheU7T3AHQhRT8mhGuqVKotEJkM0](https://docs.google.com/presentation/d/1PUKzbRQOEgHaOmaEheU7T3AHQhRT8mhGuqVKotEJkM0/edit#slide=id.g841dc8bc44_0_5)
Edit this diagram:
[docs.google.com/presentation/d/1PUKzbRQOEgHaOmaEheU7T3AHQhRT8mhGuqVKotEJkM0](https://docs.google.com/presentation/d/1PUKzbRQOEgHaOmaEheU7T3AHQhRT8mhGuqVKotEJkM0/edit#slide=id.g841dc8bc44_0_5)
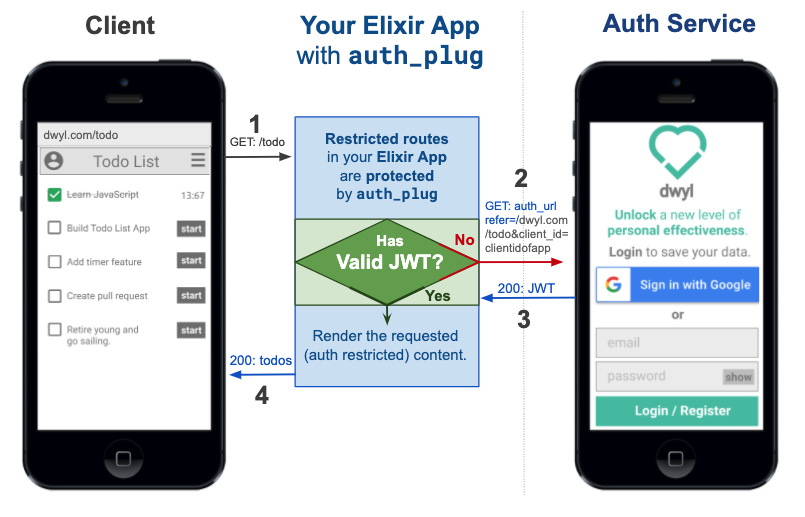
auth_plug protects any routes in your app
that require authentication. <br />
auth_plug is just
57 lines
of (significant)
code;
the rest is comprehensive comments
to help everyone understand how it works.
As with all our code,
it's meant to be as beginner-friendly as possible.
If you get stuck or have any questions,
please ask!
Who? 👥
We built this plug for use in our products/services. It does exactly what we want it to and nothing more. It's tested, documented and open source the way all our code is. It's not yet a general purpose auth solution that anyone can use. If after reading through this you feel that this is something you would like to have in your own Elixir/Phoenix project, tell us!
How? 💡
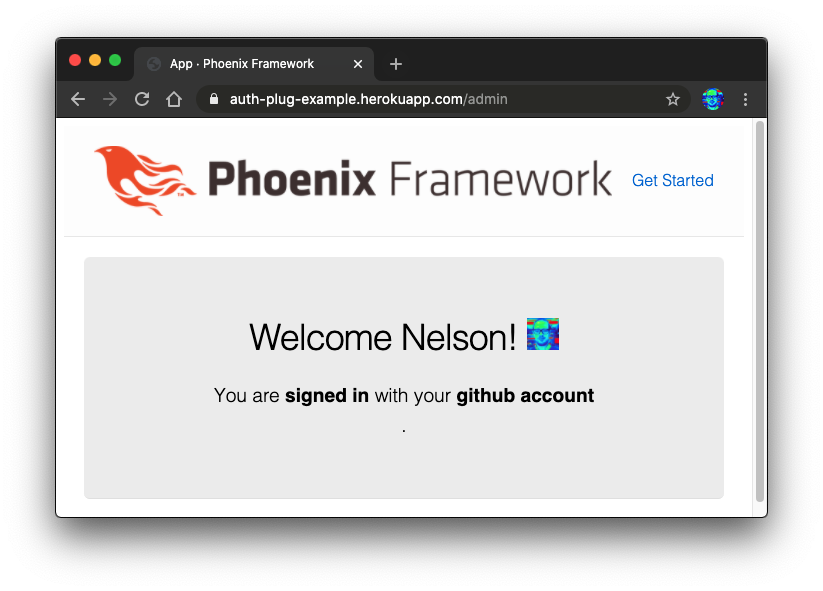
Before you attempt to use the auth_plug,
try the Heroku example version so you know what to expect: <br />
https://auth-plug-example.herokuapp.com/admin
Notice how when you first visit the
auth-plug-example.herokuapp.com/admin
page, your browser is redirected to:
https://dwylauth.herokuapp.com/?referer=https://auth-plug-example.herokuapp.com/admin&auth_client_id=etc.
The the auth service handles the actual authentication
and then transparently redirects back to
auth-plug-example.herokuapp.com/admin?jwt=etc.
with a JWT session.
For more detail on how the Auth service works,
please see: https://github.com/dwyl/auth
If you get stuck during setup, clone and run our fully working example: https://github.com/dwyl/auth_plug_example#how
1. Installation 📝
Add auth_plug
to your list of dependencies in mix.exs:
def deps do
  [
    {:auth_plug, "~> 1.1.0"}
  ]
end
Once you've saved the mix.exs file,
download the dependency with:
mix deps.get
2. Get Your AUTH_API_KEY 🔑
Visit: https://dwylauth.herokuapp.com/settings/apikeys/new
And create your AUTH_API_KEY.
e.g:
2.1 Save it as an Environment Variable
Create a file called .env in the root directory of your app
and add the following line:
export AUTH_API_KEY=2cfxNaWUwJBq1F4nPndoEHZJ5YCCNqXbJ6Ga/2cfxNadrhMZk3iaT1L5k6Wt67c9ScbGNPz8BwLH1The run the following command in your terminal:
source .envThat will export the environment variable AUTH_API_KEY.
Remember to add .env to your .gitignore file.
e.g:
echo ".env" >> .gitignore
3. Add AuthPlug to Your router.ex file to Protect a Route 🔒
Open the lib/app_web/router.ex file and locate the section:
  scope "/", AppWeb do
    pipe_through :browser

    get "/", PageController, :index
  end
Immediately below this add the following lines of code:
  pipeline :auth, do: plug(AuthPlug, %{auth_url: "https://dwylauth.herokuapp.com"})

  scope "/", AppWeb do
    pipe_through :browser
    pipe_through :auth
    get "/admin", PageController, :admin
endExplanation
There are two parts to this code:
-
Create a new pipeline called
:authwhich will execute theAuthPlugpassing in theauth_urlas an initialisation option. -
Create a new scope where we
pipe_throughboth the:browserand:authpipelines.
This means that the "/admin" route is protected by AuthPlug.
Note: Ensure the route you are protecting works without
AuthPlug. If in doubt simply comment out the linepipe_through :authto check.
4. Attempt to view the protected route to test the authentication! 👩💻
Now that the /admin route is protected by auth_plug,
attempt to view it in your browser e.g: http://localhost:4000/admin
If you are not already authenticated, your browser will be redirected to: https://dwylauth.herokuapp.com/?referer=http://localhost:4000/admin&auth_client_id=etc
Once you have successfully authenticated with your GitHub or Google account,
you will be redirected back to localhost:4000/admin
where the /admin route will be visible.

That's it!! 🎉
You just setup auth in a Phoenix app using auth_plug!
If you got stuck or have any questions, please open an issue, we are here to help!
Documentation
Documentation can be found at https://hexdocs.pm/auth_plug. <br /> All our code is commented, but if anything is unclear, please open an issue: https://github.com/dwyl/auth_plug/issues
Recommended / Relevant Reading
If you are new to Elixir Plug, we recommend following: github.com/dwyl/elixir-plug-tutorial.
To understand JSON Web Tokens, read: https://github.com/dwyl/learn-json-web-tokens.